

Beam pioneered as the initial cryptocurrency featuring a distinctive variation of the mimblewimble protocol encompasses a wealth of information, with the central features being:
- Increased Privacy
- Enhanced scalability and minimized blockchain data
For those gearing up to mine this digital currency, delving into our article is advised, as it sheds light on its unique functionalities compared to Monero and ZCash.
Beam utilizes the Equihash 150/5 framework, coded in C++, and leaves the door open for potential ASICS integration in the future.
You might have heard about Grin emerged as the subsequent digital currency to adopt a model of the mimblewimble concept. A comparison highlights structural disparities between Beam and Grin. Specifically, Grin supports IP, file, and standard address transactions, while Beam employs temporary IDs for wallet interactions, with an opportunity for creating fixed IDs to maintain privacy as regular IDs evolve with each wallet connection.
With this understanding of Beam's specifics, let’s venture into mining BEAM!
Some General Mining Tips
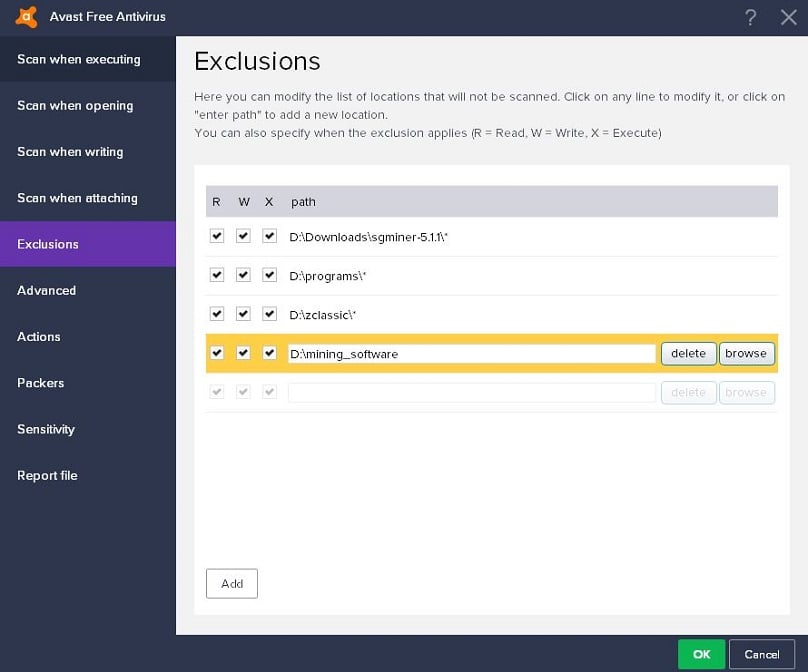
Before diving into this detailed guide, here are a couple of strategic tips to enhance your mining journey. First, ensure your GPU drivers are up-to-date. Additionally, most mining programs might get flagged as malicious by security software. Thus, if mining on a daily-use or gaming PC equipped with antivirus, you'd want to exclude your mining programs from scans. My strategy involves organizing all mining software within a single folder, excluding that folder from antivirus protection to bypass this issue.
Wallet Setup
We'll also cover the wallet setup process in this guide because mimblewimble-based currencies like Beam differ significantly from others. One key distinction is the absence of standard addresses, with wallets instead interacting to transfer crypto without needing an online connection. To accommodate unfamiliar users, Beam offers IDs to facilitate wallet connectivity. Recognizing these aren't permanent for privacy reasons, for mining, we must generate an ID that remains active indefinitely.
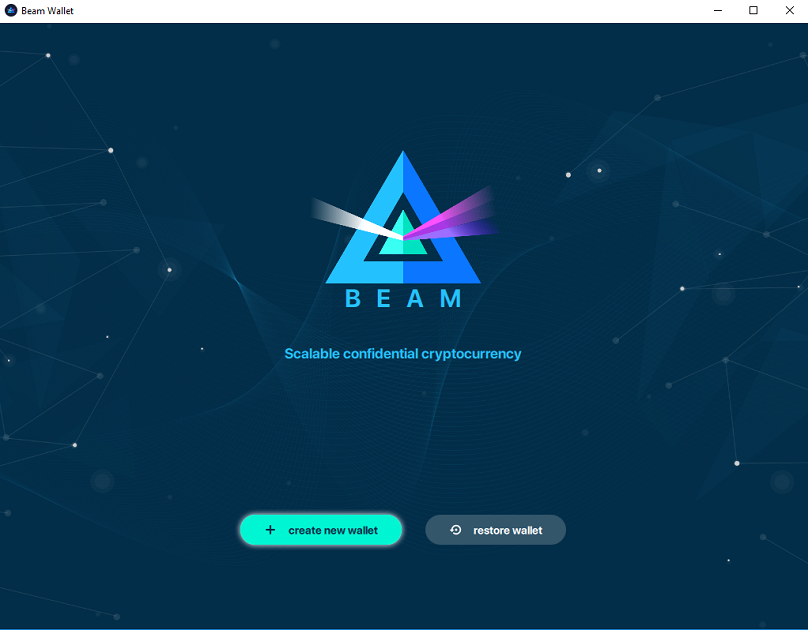
There are wallets support encompasses systems for Windows, Mac, and Linux, alongside integrated miner wallets and independent mining applications. Choose from CLI and GUI variants. In this guide, we’ll employ the Windows GUI featuring just a CPU miner, albeit external miners have been shown to yield superior results.
Installing this is comparable to any standard Windows application installation. After downloading and setting up, click to initiate a new wallet.
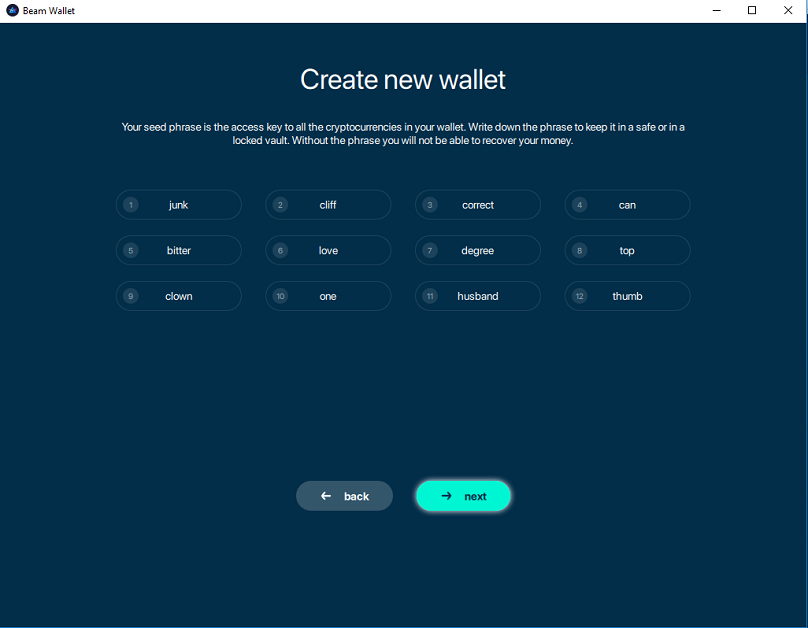
Keep your seed words documented, as these form your wallet's private access key.
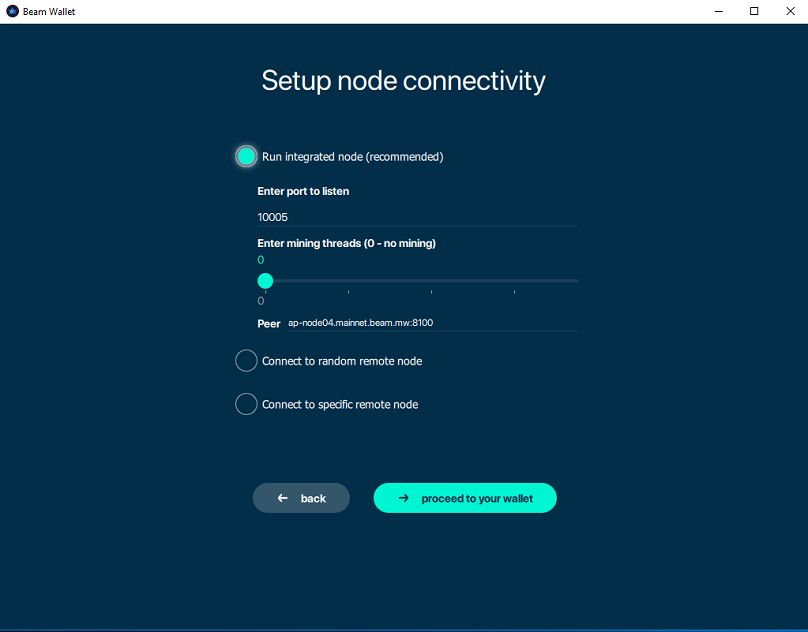
Typically, consider operating your own node to uphold privacy standards, while setting mining threads to zero.
Wallet Usage
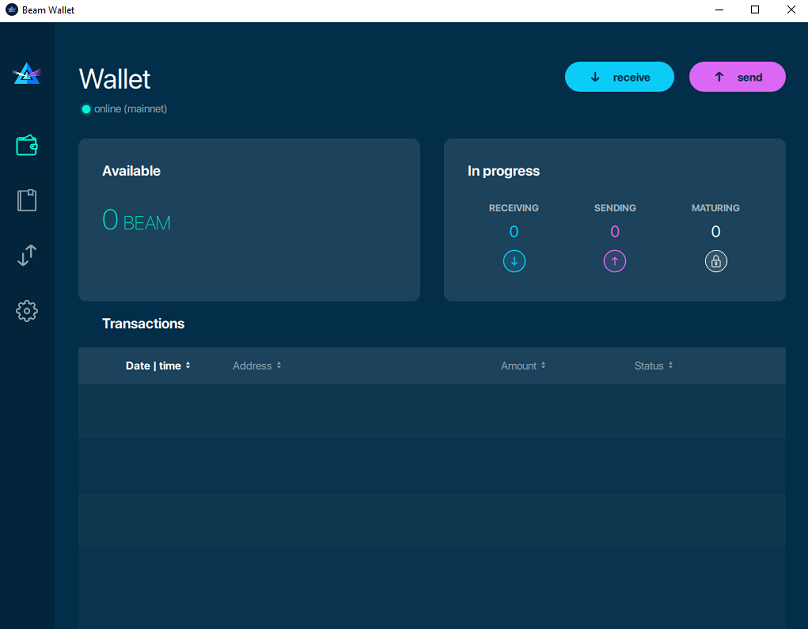
Post node sync, you’ll land on the dashboard.
Here, you'll find the payment record at the base, available or spendable balance to the right, with ongoing transactions depicted to the left.
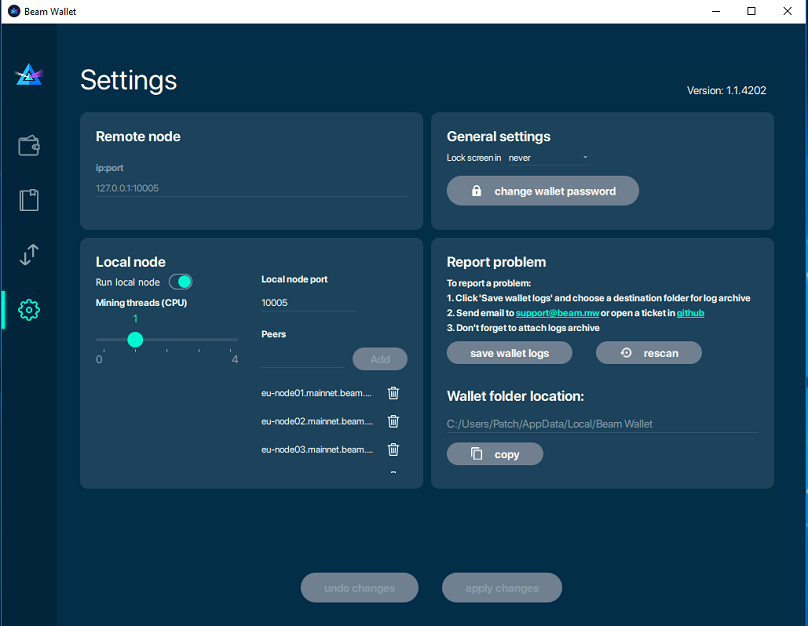
Settings are the hub for viewing and modifying wallet data, and initiating any CPU mining threads.
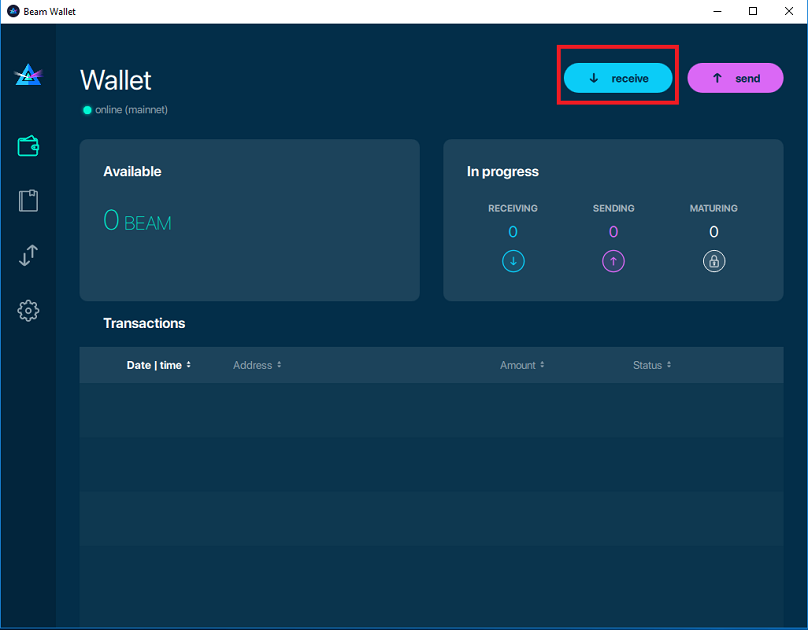
The address section is our focal point for mining, where an ID already appears pre-configured. Normally, these addresses expire in 24 hours once formed.
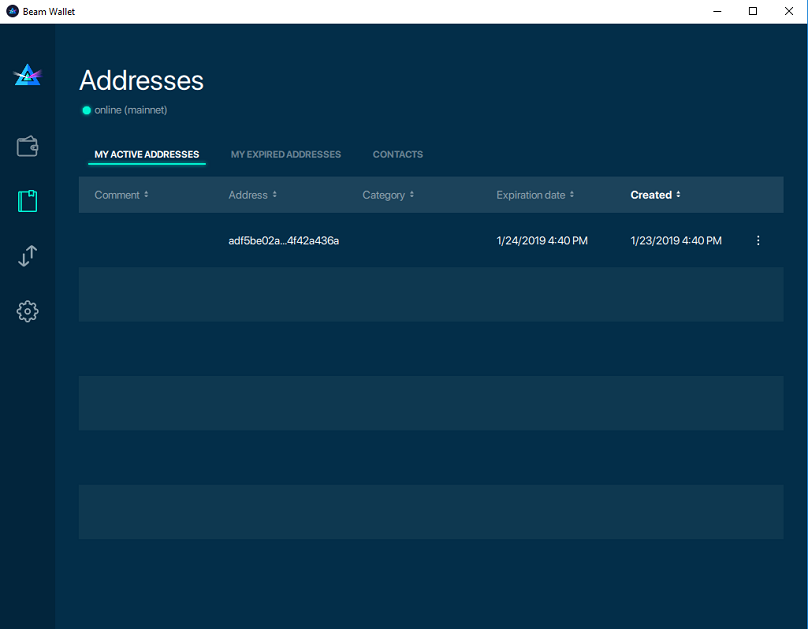
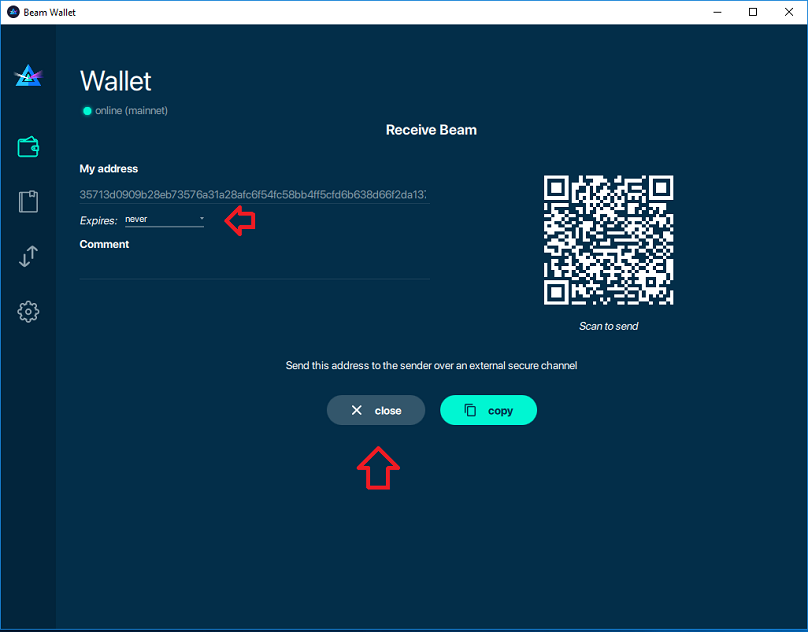
We'll need an unexpiring address for mining. Head to the main wallet tab and hit 'receive' to create this.
Then, change the wallet's expiration setting to never and confirm by closing.
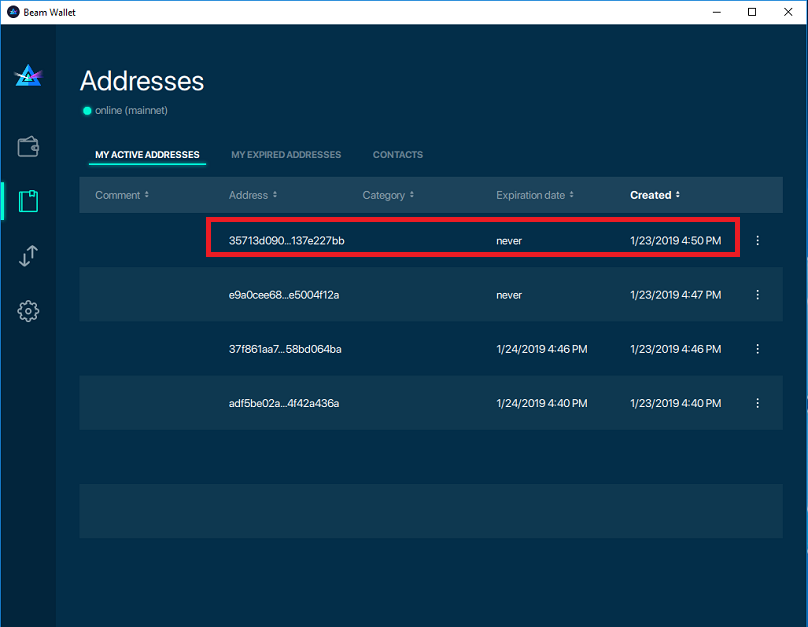
Verify your integrated address in the wallet by accessing the addresses section. You’ll notice the newly created address designated to not expire.
We’ll bypass the transaction sending aspect, given its similarity to standard approaches (designating a fee and inputting the sender’s address). A concise summary of our discussion here, plus transaction instructions, can be found on their websites wallet instructions You’ll also access more detailed tutorials in their official wallet guide PDF .
Mining Pools
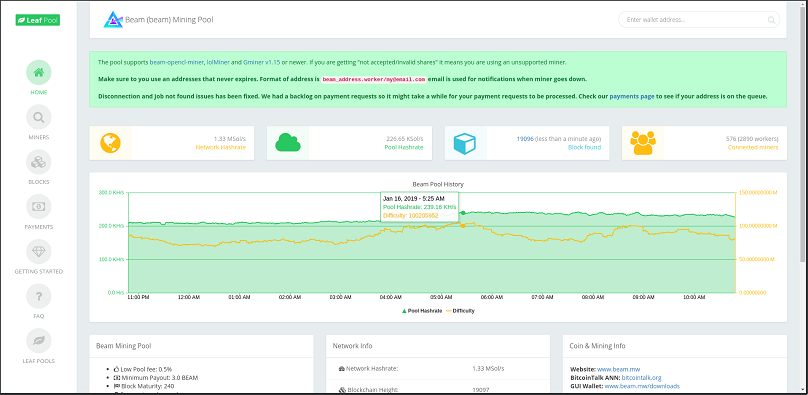
For this tutorial we will use https://beam.leafpool.com/ I opted for this specific pool due to positive past experiences in previous mining-related content and the negligible 0.5% fee.
Equipped with a pool, we embark on mining!
CPU Mining
For CPU Mining we can download the official Beam wallet leverage the GUI miner. We’ll bypass CPU mining due to its comparatively inferior profitability against GPU mining.
GPU Mining – Nvidia
For Nvidia GPU mining we can use GMiner The miner mandates a 2% development fee and operates on Windows and Linux systems.
After downloading, the application is intuitive.
Within the miner's folder, construct a new batch file (or script for Linux users) and include the following:
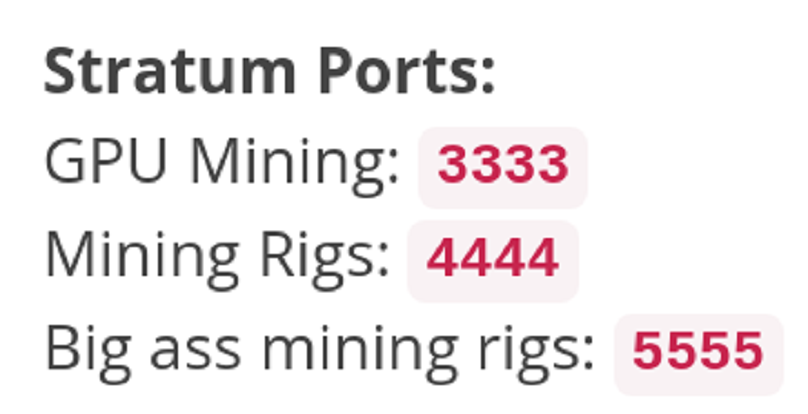
miner --algo 150_5 --server mining_pool_server --port mining_pool_port --ssl 1 --user YOUR_ADDRESS.WORKER_NAME
Replace “mining_pool_server” with your desired server
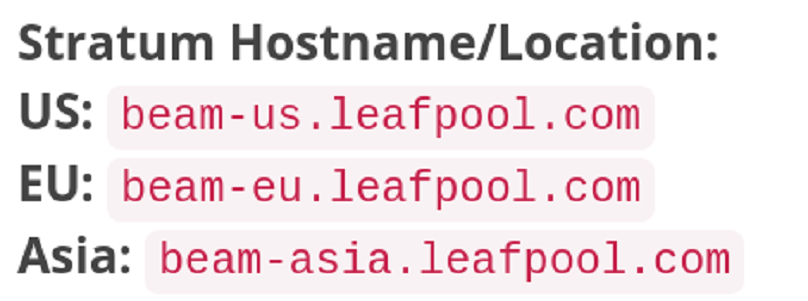
Замените «port» на порт, который вы хотите
Substitute “wallet_public_key” with your wallet address. Ensure employment of a permanent address in your Beam wallet, set to never expire.
The 'Worker' tag is customizable for identifying multiple mining devices. I might use address.officecomputer for one, while tag address.gamingcomputer for another.
Doing this helps track performance via the pool's dashboard.
Например, моя настройка:
miner --algo 150_5 --server beam-us.leafpool.com --port 3333 --ssl 1 --user 328a60fc7588850be8183c0e30f5b2319d06650c06203e0a9ddb739c36f004dc
Double-click the batch file to activate the miner, and expect a display resembling this:
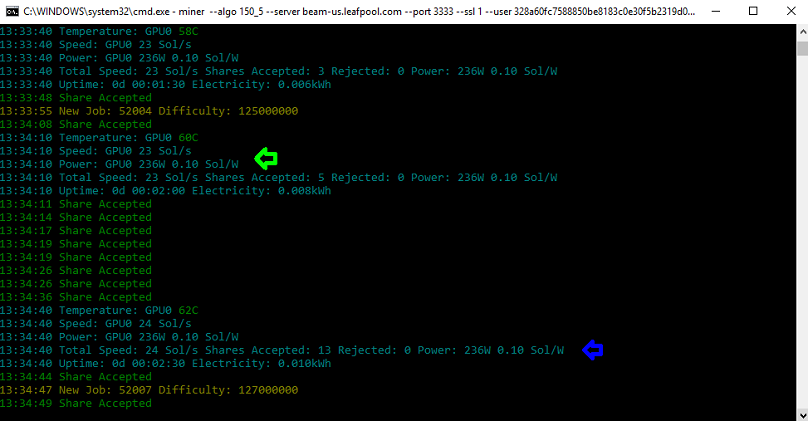
A blue arrow illustrates GPU temps and speeds, along with cumulative speed figures.
Green arrows display GPU power usage data.
Майнинг на GPU – AMD
Для AMD есть lol miner . Он имеет комиссию разработчиков 1,5%
lolMiner.exe --coin BEAM --pool mining_pool --port port --user wallet_public_key
Reassess and enter your chosen “mining_pool” server
Замените «port» на порт, который вы хотите
Substitute “wallet_public_key” with your wallet address. Ensure employment of a permanent address in your Beam wallet, set to never expire.
The 'Worker' tag is customizable for identifying multiple mining devices. I might use address.officecomputer for one, while tag address.gamingcomputer for another.
Doing this helps track performance via the pool's dashboard.
Например, моя настройка:
lolMiner.exe --coin BEAM --pool beam-us.leafpool.com --port 3333 --user d6c70b19ae3da1c0081798b52723e03beb06368c0944d3d1e3c592e248e7f4baa
Double-click the batch file to activate the miner, and expect a display resembling this:
Note: The image originated from my article on How to Start Mining Aion (AION): A Detailed Guide for Newcomers
Encountering obstacles? Consider adjusting a few parameters.
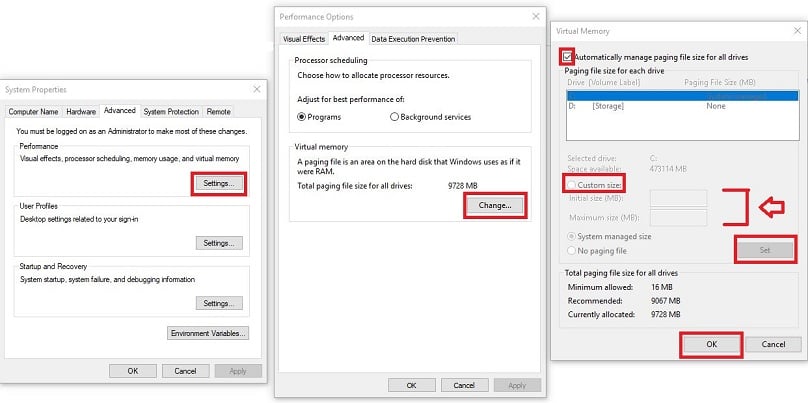
Lack sufficient virtual memory? You might need 16GB or more (for Vega GPUs, 16GB per unit). Navigate to Control Panel -> System and Security -> System, select Advanced system settings, then advanced tab settings. Under this, modify virtual memory settings: deselect automatic management, choose custom size, input (MB) for both fields, then save changes.
Общие проблемы с устранением
If observing stale or rejected shares, consider connecting to a nearer server. Abundant rejected shares might mean reducing the miner’s intensity if feasible.
Сколько BEAM я заработаю в день?
Чтобы выяснить это, нужно перейти на https://crypt0.zone/calculator/details/BEAM and integrate their calculation tool. Although it provides rough estimates, real payments may vary.

Defaults are mostly accurate, with minor adjustments necessary.
Hash rate: Enter aggregate speed (in MH/s) across all your mining units. Verify this tally from your mining software’s 'total speed' value. Sum all computers tasking Beam mining.
Power: Record the cumulative power (in watts) your mining setup consumes. Your mining software might measure this, or utilize external options like a kilowatt meter for precise readings. Assess total power use across all systems engaged in Beam mining.
Electricity Cost: Input per kilowatt hour costs from your electricity provider. This is typically listed on your bills and company website.
Pool fee: Include pool plus miner software fees. Nvidia entails 0.5 + 2 = 2.5%, while AMD computes at 0.5 + 1.5 = 2
Hardware cost: Summarize expenses incurred for hardware acquisition.
Visual representation assists in reviewing potential coin and USD yields across timespans. Consider the Profit segment post-electricity cost. I gravitate towards daily USD payouts, using these figures to comparatively evaluate potential earnings from different coins. Remember, balancing daily profits with coin market cap matters. A low cap coin may offer high gains one day, but fluctuate rapidly the next. Particularly for recently launched coins with much buzz, factor in these dynamics relative to immediate selling or holding strategies.
This concludes our guide. You should now be mining BEAM! Enter your public key at the mining pool’s dashboard for stat tracking.


1Комментарий
Getting Started with Mining BEAM: A Newcomer's Guide